[Disclosure: This post contains affiliate links, which means we may receive a commission if you click a link and make a purchase. For more information, visit our disclosure page].
About two decades ago the thought of creating a website for someone who doesn’t know how to code was quite stressful; however, that all changed with the platform called WordPress, a free and open-source content management system since 2003.
Anyone with even the basic knowledge on how to use a computer can set up a website or a blog at ease. All it takes is just 30 minutes to an hour of your time for you to start your brand new website. We will guide you to create your website without any hassle in the simplest possible way using WordPress.
This tutorial will lay out step-by-step procedure involved in the making of your website right from the beginning to the end. We will use Bluehost as the domain and web hosting provider, a company which has over 2 million websites using its hosting service.
Our site is set up using WordPress with Bluehost as our web host and we are using a free theme. Though this site needs customization, we have decided to do nothing and just observe user experience. Creating a website is really simple than you think.
How to Create a Website from Scratch? – Simplified
Though there are multiple ways to create a website, most webmasters set up their websites via WordPress, a popular website building platform used by websites on the Internet.
There are 3 most important steps involved in the website creation process.
Step #1: Domain Name (get your own domain – example: www.sitename.com)
Step #2: Web Hosting (hosting service for your website)
Step #3: WordPress Installation (free platform/software to set up your website)
Getting a domain name is the first and foremost step in the setting up process. Of course, you can buy a hosting package without creating a domain if you intend to add it later; however, to keep it simple first get a domain for your website. Try to come up with a unique domain name which could be easily remembered by your audience.
Once you get your domain, you need a web hosting service that will make your website accessible via the World Wide Web. You can get a domain and buy a hosting package from Bluehost, the most trusted company in the web hosting industry.
After you are done with domain and web hosting, the most simple and final step is to install WordPress. Bluehost helps you install WordPress with just a click. In fact, WordPress.org has been recommending Bluehost since 2005.
Creating a Website with Bluehost & WordPress – Step-by-Step Instructions
Step #1: Choose a Domain Name – Domain names are available for as low as ₹800 to ₹1000 a year. If you want to target international visitors, then you should consider a generic domain name extension; however, if you want to target local visitors, then local domain name extension may be appropriate. It is optional, you can go with either of them.
Example of generic domain extension: .com, .net, .org
Example of local domain extension: .uk, .fr, .in, .de, .ru
At Bluehost, local domain extension is limited to the United Kingdom and the United States of America. We would recommend you go with a generic domain extension.

Domain name can be anything. It could be your name in case of a personal blog, example – yourname.com or the legal or brand name of your business, example – apple.com, samsung.com; however, please be careful not to take a part of the trademark names of already existing corporates or other businesses. Try to create your own brand name.
Step #2: Register Domain & Buy Hosting Plan – One cannot set up a website without website hosting. While domain is the name or address of your website, hosting facilitates in the storage of your web data or files (content) on the hosting company’s secure server which is always live and functional 24/7.
We recommend using Bluehost for both domain and web hosting services. They provide free domain registration and free SSL certificate for the first year. Following are the steps involved in the creation of a website using the Bluehost domain & hosting service with WordPress.
[Disclosure: Our content is reader-supported and contains affiliate links, i.e., if you purchase web hosting and/or a domain name through our affiliate links, we earn a commission at no additional cost to you].
1. Visit Bluehost or Bluehost India and click on “Get Started”

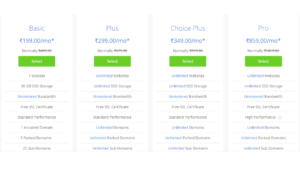
2. Choose the hosting plan which suits you
Bluehost hosting plans start from ₹199/month (price may change on a daily basis). Someone starting a new website will most probably only need the Basic plan and can scale up to a more advanced plan when required. Below is a screenshot view of the hosting plans of Bluehost.
3. Register a domain name (free for the first year):
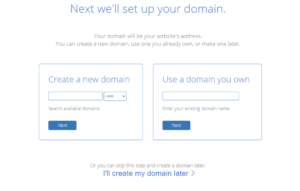
You can create a new domain from Bluehost or from other service providers like GoDaddy or Domain.com. If you already have a domain name brought via other providers, you can add that in the “Use a domain you own” box and click next; however, you will need to update your name servers. You can refer to this help article from Bluehost on this for guidance.
Once you enter the domain name, you will be asked to fill up the required information for registration purposes, includes payment details.
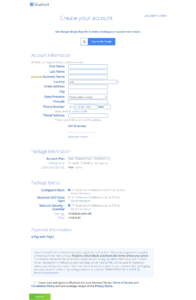
Below listed are the Bluehost pricing package for shared hosting- (price may change on a daily basis). Do visit the site and check for offers.
- 36 Months: ₹199/Month
- 24 Months: ₹259/Month
- 12 Months: ₹299/Month
The longer duration package is very cheap and you can save some money if you opt for this plan.
Once you make the payment, you will receive e-mails from Bluehost to your registered e-mail ID guiding you in creating password to access your account.
4. On successful completion of the registration process, you will get access to your account.
Step #3: Installation of WordPress via Web Host – As stated above, WordPress is one simple CMS for setting up a website. Once you get your domain name and web hosting account is accessible, you can install WordPress with just a click.
A. Steps involved in installing WordPress website on Bluehost.
1. Log in to your Bluehost account
2. Click on “My Sites” and then click on “Create Site”
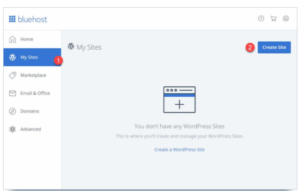
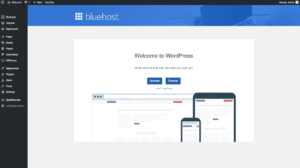
3. Enter the appropriate information which is being prompted about your site. It is self-explanatory and easy to follow. WordPress will get installed in about a minute or two.
4. Once the setting up process is over, Bluehost will show you the installation and login details. This information is important and needs to be noted down. You need to save this somewhere safe for easy access. It will also be sent to your registered e-mail ID.
B. Check if the installation was smooth and everything is working fine.
When a domain is newly registered, the nameservers are changed, or DNS changes are made, you should expect a propagation time up to 24 hours, i.e., your site may not be up and functional during the first 24 hours. So, don’t panic if you see this happening to you.
If the installation went on as expected, the site should load when you type in your domain name in the web browser after the first 24 hours. If problems exist, contact Bluehost customer support and they will help you out.
By default, WordPress loads up the current year theme for your website; however, you can always change to a new free theme or premium theme in WordPress. You have plenty of themes available on the WordPress platform to choose your favorite one. Below is a screenshot view of some of the themes.
C. Verify SSL certificate status.
It has now become customary to see the majority of websites over the Internet use an SSL certificate. It is believed that SSL certificate is one of the many factors being considered for Google rankings. Having an SSL certificate may also help in SEO. Few years ago you would have to get it separately by paying extra money to an SSL certificate issuing company, but nowadays most of the hosting providers give it for free with their hosting plans.
Bluehost automatically adds an SSL certificate when you create a website or install WordPress. You can verify your site’s SSL status by doing the following:
1. Log in to your Bluehost account
2. Click on “My Sites”
3. Select the site and click on “Manage Site”
4. Go to the “Security” tab
5. Under the “Security Certificate” you will find “Free SSL Certificate” status
When you load your website on the web browser, you should be able to see a lock icon along with your domain name. That is it. You have now set up your website.
You’re Ready to Go, Now Start Your Website.
We hope that this guide has helped you in setting up your website with Bluehost & WordPress. If you need any clarification in the setting up process of your website, please feel free to contact us.